
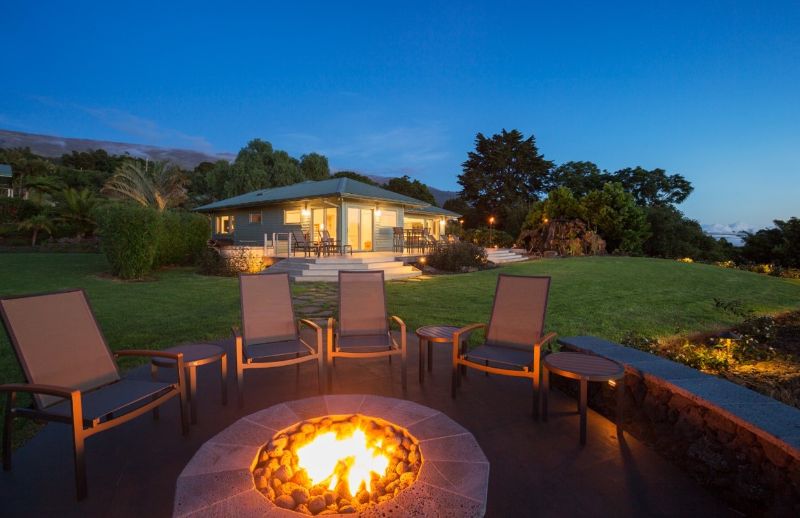
There is no better way to spend a crisp winter evening than around a fire pit at home. Whether you are sharing a bottle of wine with friends or toasting marshmallows with your children, there are countless opportunities for making memories around a fire pit. Fire pits are a popular outdoor hard landscaping idea but can be expensive to have professionally done. Luckily, you can easily create a fire pit yourself to your exact desired design and in a budget-friendly way with our easy step-by-step guide to creating a fire pit at home. When you need a quick and easy way to create mortar for your fire pit, B&S Commercial Power has you covered with affordable cement mixers.
Steps to Create a Fire Pit at Home:
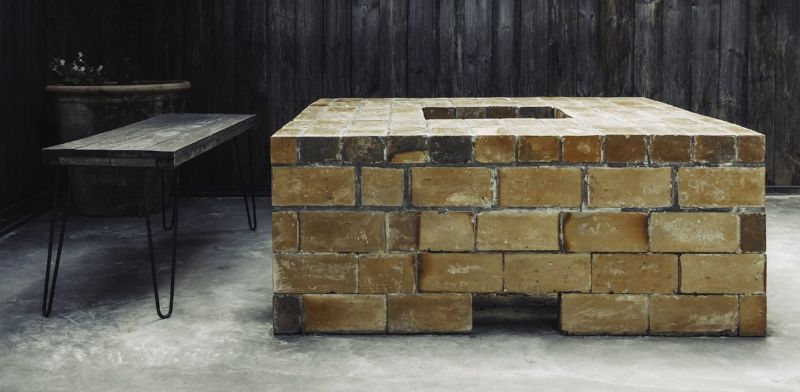
Whether you are looking for a way to spend more time outside or increase the value of your garden space, fire pits are an excellent addition to your outdoor space. Follow these easy steps to start enjoying the warmth, fun, and memories that come from having a fire pit at home. Our guide is designed to assist you to create a simple, rectangular fire pit using bricks and mortar, but you can craft a custom fire pit using the same principles in this guide.
Step 1 – Find Your Location:
You first need to find the ideal location in your garden for your fire pit. From a safety perspective, your fire pit should be roughly 8 metres away from any structures and positioned away from any low-hanging trees to reduce the risk of the fire accidentally spreading. You should also opt for a flat, even space to make building the fire pit easier.
Step 2 – Choose Your Design:
When you create a fire pit yourself, you have unlimited options for the style and design of your fire pit. You can customise the size, shape, and materials used to build your ideal fire pit for your outdoor area. From rectangular to circular in design to brick, stone, or concrete block in material, the choice is yours for the design. You can easily look online at various fire pit styles for inspiration.
Step 3 – Get Prepared:
You cannot begin your fire pit building without first stopping at your local building supplies store. This will ensure that you are fully prepared so that when your fire pit project begins, you have everything ready to go. We have outlined the supplies you will need to begin building your fire pit at home.
- Personal protective gear, including goggles, work gloves, and a face mask.
- Bricks.
- 1 40kg bag of premixed cement and sand.
- Water.
- 1 cement mixer, or a shovel and wheelbarrow if you plan to mix by hand.
- Tape measure.
- Spade.
- Cement trowel.
- Spirit Level.
- Hammer.
- Sponge.
- String.
Step 4 – Begin Building:
Now it is time for the exciting part – building your new fire pit! Building a fire pit is fairly easy and quick, which you can easily do by following our outlined steps. We have outlined the steps to create a rectangular fire pit using bricks as this is the most common fire pit to build, but you can apply this general process to a fire pit of any size, shape, or material.
Clear the Ground: You first need to ensure that the surface where your fire pit will be is clear. This may include moving any landscaping items, grass, or plants. You may also need to trim back any trees that are hanging above your fire pit.
Determine the Size: Using your tape measure, measure out the ideal size for your rectangular fire pit. Once you have measured the size, use the string to mark the exact line and size of your fire pit. You will use this line to dig the foundation and keep your bricklaying uniform.
Dig a Foundation: You are going to need some muscle power to dig a small foundation for your fire pit. Using your shovel, remove approximately 5cm of the soil in the width of your brick and along the length of your measured size for your rectangular fire pit. This will give your fire pit a firm base and solid support to ensure lasting memories.
Flatten the Surface: Once all the soil is removed, you are going to need to flatten the surface. You can take anything with a flat surface, such as a plank, and gently pound the ground until it is hard and smooth. If your soil is soft, you may need to add a layer of river sand to get a sturdy surface. Take your spirit level and ensure the entire foundation is equal and flat.
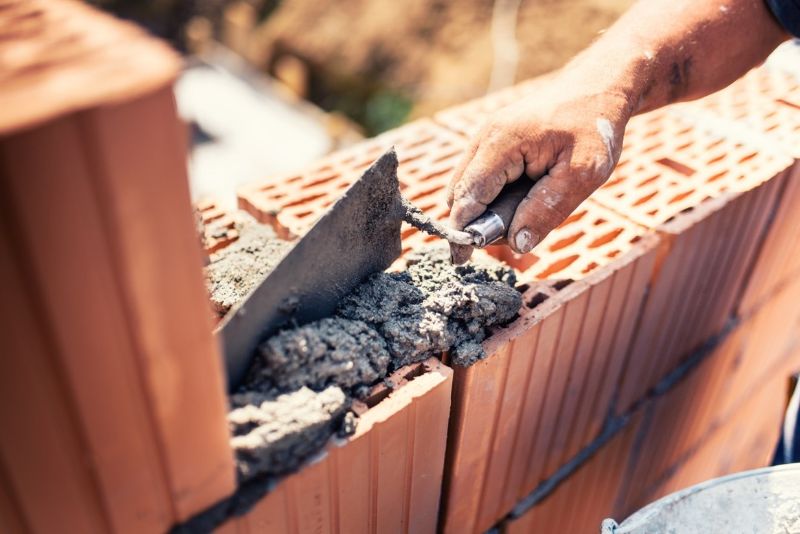
Put On Your Protective Gear: Wearing personal protective gear is essential when you are working with cement. As you are mixing the cement with the sand to make the mortar, you are at risk of inhaling the cement that gets into the air, having a skin reaction if you touch the cement without gloves, and can potentially get the wet mortar in your eye by mistake. Before you start mixing the mortar and applying the mortar to the foundation and bricks, put on your goggles, gloves, and face mask.
Mix Mortar: When mixing mortar, you have two options. The first way to mix mortar is to place the sand and cement into a cement mixer and slowly add water until a thick consistency is achieved. This is the fastest and easiest way to mix your mortar perfectly. If you are mixing by hand, place the cement and sand into a wheelbarrow and thoroughly combine using a spade. Slowly add water to your wheelbarrow until a mortar consistency is achieved.
Place First Layer of Mortar: Using your cement trowel, you are going to place blobs of mortar in equal portions on your foundation. Using the flat part of the trowel, level out the mortar until it is equal and smooth.
Optional – Soak Your Bricks: To assist in the curing process, you can soak your bricks in water before you start to lay them. The wet bricks will delay the mortar drying time, ensuring a stronger bond between the bricks and the mortar.
Lay First Layer of Bricks: Using your string line as the guide, start placing your first layer of bricks onto the mortar. Work your way around your foundation until you have completed the base level of your fire pit. Take your hammer and gently hammer the bricks until equally level. To ensure the surface is flat and level, check it with your spirit level.
Repeat Process: Repeat steps 7 and 9 until you have achieved the desired height of your fire pit.
Clean Bricks: Taking your slightly damp sponge, gently wipe away any excess mortar to achieve a clean finish.
Optional – Smear Excess Mortar for Finish: If you have left over mortar and are looking for a concrete smear finish, you can make your left over mortar slightly wetter and rub it onto the surface of your bricks with the sponge.
Cover with Plastic Sheet: Gently place your plastic sheet over your completed fire pit. The plastic sheet is a curing method that will ensure that the water does not evaporate too quickly from the mortar.
Step 5 – Allow Mortar to Cure:
Generally, your mortar should be dry to the touch within 28 to 48 hours. Then you will need to wait up to 28 days, depending on environmental factors such as rain and wind, to allow for the mortar to fully cure. Curing is an essential step to ensure strength and durability, so it is important that you do not rush this step before you start enjoying your new fire pit.
Cement Mixers at B&S Commercial Power:
Cement mixers from B&S Commercial Power will make building your DIY fire pit that much easier. You can effortlessly place your cement, sand, and water into your cement mixer and have homogeneously mixed mortar in minutes. Do not let back-breaking mortar mixing take the fun out of your DIY fire pit project with our cement mixers.
You will find a wide range of Baumax cement mixers available at our store and online. We are a proud supplier of Baumax cement mixers due to their durability, quick mixing speed, and safety features. Baumax cement mixers will make the mortar mixing process speedy so that you can start enjoying your new fire pit as soon as possible.
We pride ourselves on offering high-quality cement mixers at affordable prices. You can easily find a cement mixer suited to your budget with our wide range. For the DIY enthusiast, a cement mixer makes for an ideal investment for additional mortar or concrete projects around your home.
If you are still feeling uncertain about whether or not a cement mixer is worthwhile for your DIY fire pit project, you are welcome to discuss your project with any of our sales or technical staff. We will happily advise you on the best solution for your needs and demonstrate the time and effort-saving qualities of cement mixers. We are always ready to help you with your DIY home projects by offering you the best advice and power tools for the job.

About B&S Commercial Power:
B&S Commercial Power is a Cape Town-based supplier of robust power tools. You can easily find cement or concrete mixers, brushcutters, generators, ride on mowers, chainsaws, and more at our store and our online store. We supply a diverse array of power tools to ensure that we are your total solution for your construction, agricultural, forestry, or residential tool requirements.
At B&S Commercial Power, you will find both imported and locally manufactured power tools. Brands like Husqvarna, Briggs and Stratton, Honda, Stihl, and Baumax are proudly displayed on our shelves. We select only the highest quality brands so that you receive power tools of the highest performance from us.
In addition to our exceptional power tools, you can also find expert technical and sales staff at our store. B&S Commercial Power has a team with over 100 years of combined experience. This ensures that no matter your query, our team is able to advise you to a professional and personalised standard.
If you are unable to visit our physical store, there is no need to worry. You can easily purchase your desired power tools from our online store and we will then deliver them to your home or business. We deliver to the whole of Southern Africa to ensure that a wide range of individuals or businesses has access to the quality, affordability, and performance of B&S Commercial Power tools.
Make mixing mortar for your DIY fire pit quick and easy with cement mixers from B&S Commercial Power.